THE BLESSINGS OF CREATIVITY...

I thank the LORD JESUS for each day that is given me to create wonderful projects...As always, I give Him all the glory.


Friday, December 24, 2010

Not a Card....But Sweet, Yummy Cake Pops!

Merry CHRISTmas Everyone!  Yes, it's my favorite time of the year...So many fond memories of my childhood coming back to me at this season.  Knowing the true meaning of this day  gave me a deeper meaning for living.  It's not all about the gifts, the nice clothes, the food, parties and meeting up with your family and friends that is most important...not even the crazy shopping that I enjoy a lot.  It's knowing that my Savior Jesus came to give me hope and love despite my rebellion and imperfections, He loves me!  And the good news is that He loves you too!  All we need to do is to make a decision to accept the gift He gave us for our salvation....Himself!

Anyway, I have sent handmade Christmas cards to all my friends but looking on giving goodies everyone will enjoy and I am happy to have come across Ms. Angie Dudley, author of the book  "Cake Pops."  I was trying to decide on whether to buy her book and had to see her video teaching how to make Cake Pops...Soon, I find myself paying for the book and went to the store to gather the ingredients I needed.  You can visit her website at www.bakerella.com to see loads of sweet projects...
Here is my 5 year old son modeling one of the very first Cake Pops I made...This is a magnet for kids...LOL


 JARED, WITH HIS YUMMY CAKE POP:

CAKE POPS...3 HOURS LATER: 

CLOSE-UP OF THIS YUMMY POPS:
I can't believe I can make a wonderful treat like these for my first time...Thanks Bakerella!

CAKE POPS: ALL WRAPPED UP AND TAGGED:
I used a clear wrap on each one, gave them a tag and a ribbon...My hubby was amazed when he saw this after he came home from work.  He's super impressed!  

 
JARED, NOTHING BUT LOVE FOR THE CAKE POPS:
He was very happy and proud to share these yummy treats to his friends at Church last Sunday.   
 
 JARED, CAKE POPS AND THE BOOK:


 DO YOU WANT ONE?....YOU GOT TO MAKE ONE!
Thanks a lot to Ms. Angie Dudley for sharing with us this very special treat.  I am not sure my husband likes you as he sees me now trying to buy some more materials to make other kinds of cake pops...He's bought me Cardmaking/Scrapbooking stuff and now, baking stuff!...LOL  Anyway, I will keep giving him treats so that he will just remember the taste and not the expenses...

To all my followers/viewers, wishing the best CHRISTMAS today and may the true meaning of this season become so real in your lives.  God bless! 

Tuesday, December 14, 2010

3 Birds CHRISTmas Card...

During this blessed Christmas season, we often meet up with our love ones, give them gifts and so many things that tradition taught us to do.  Some are necessary, others are not.  But when we know the "TRUE MEANING" of this season, it will change our motive and help us see the LOVE, FAITH AND HOPE that this season brings through the birth of JESUS.  I pray that each one of us find that the baby in the manger didn't stay as a baby but grew up to ultimately pay the price for our sins.  You are loved more than you think you are.  Other than being lost from all the hustle and bustle of this season, may this be a time to reflect on whose behind the word CHRISTMAS.  He is great and mighty to save.  God bless!

Anyway, I do have friends and family to remember this blessed season so, I made this card for them.  I think the 3 birds are so cute.  I colored them with my Prismacolor markers, glittered them with my stickles.  The embossing added a great feel to the card together with a wonderful sentiment on a circle/scallop die-cut.  I used my Nestabilities too, some gems and fancy ribbon.  Hope my friends like this...


3 BIRDS CHRISTMAS CARD:


 3 BIRDS CHRISTMAS CARD (LAYERS):


3 BIRDS CHRISTMAS CARD (INSIDE):


3 BIRDS CHRISTMAS CARD WITH ENVELOPE:

Okay, it's time to go and hopefully, I can make more cards to post here real soon...Just want to let you all know that I appreciate your support of my blog and HAVE A WONDERFUL CHRISTMAS, EVERYONE!

A Little Cake Birthday Card...

 I'm back after many weeks...I've been creating Christmas cards to send to my family and friends and with the little time I have, it took me a while but I can say that I am done with those for now.  In between the Christmas cards, I am able to make this card for my step-daughter.  The stamp is from Studio G, one of the many stamps I have but never tried...I colored it with my Prismacolor markers.  With a little embossing, stickles (glitter), a cute sentiment and fancy ribbon, this card came about.  Hope you like it too. 


 A LITTLE CAKE BIRTHDAY CARD:

A LITTLE CAKE BIRTHDAY CARD (COOL LAYERS):


A LITTLE CAKE BIRTHDAY CARD (INSIDE):

  A LITTLE CAKE BIRTHDAY CARD WITH ENVELOPE:

I love to create things but most importantly, I want to give glory to the Lord Jesus for giving me the strength and ability to do the things I love.  I want to glorify Him in all the things I do and yes, even in cards!

Monday, November 15, 2010

Dino's Great Blessing...

Hey there, Card lovers!  Here's a Dustin Pike Dino digi image that I hand-colored with my Prismacolor/Bic/Sharpie markers.  Isn't he the cutest Dino ever?  My husband asked why the leaves he's eating is orange?  Well, because it's the Fall season...LOL  Anyway, just added embossing, stitching, glaze, lotsa brads and this awesome card is done...It took me several hours, though!...Well, the planning stage and deciding on the color scheme and papers to use always take the most time.  Imagine having to go through my stacks of paper just to find what I am looking for which for the most part, I don't really know till I see...LOL  But at the end, well worth the effort,  I love it!
  
DINO'S GREAT BLESSING (FRONT):
DINO'S GREAT BLESSING (COOL LAYERS):

DINO'S GREAT BLESSING (INSIDE):

 
DINO'S GREAT BLESSING WITH HANDMADE ENVELOPE-BOX: 

Hope you enjoy this fun card....Here's hoping that you are all doing great and having a blessed day in the Lord!  Till next post...

Lotsa Gifts Christmas Tilda...

I am back again with another Magnolia Tilda image, hand-colored with Gamsol technique...I thought she would look good in a Christmas-themed card.  So, together with my sewing machine, stickles and gift images I took from a designer paper from Paper Studio, this card came about.  When I take my son to play at a Bouncy place (his favorite place ever), I take my colored pencils or markers with me with some stamped images and color the hours away...While my son is having tons of fun, I am doing something productive as well...So, when I get the time to finally create something (which is not often...), I grab my colored images and find coordinating papers to compliment with the colors in the image...This is the part that is not very easy.  I give special thought on matching stuff.  Sometime, I had to look on my gazillion stacks of papers to find the ones I want to use at the very end of the search...Oh well!  But I am proud on the way this came out... 

LOTSA GIFTS CHRISTMAS TILDA:

LOTSA GIFTS CHRISTMAS TILDA (COOL LAYERS):

LOTSA GIFTS CHRISTMAS TILDA (INSIDE):
LOTSA GIFTS CHRISTMAS TILDA WITH HANDMADE ENVELOPE-BOX:

I love this Christmas card, really!  I made less than 20 Christmas cards since I started Cardmaking and this one is simply my favorite...Hope you are having a wonderful and creative day everyone!  God bless!

Monday, October 25, 2010

Oh! Prima Flowers Friendship Card...

Hello there, folks!  Been away from the blogging world for a few weeks but I was totally busy doing some cards, work, Bible classes and many more.  Today I have 4 cards I added eventhough my eyes are quite sleepy while typing this...I'm telling myself, I need to get done so, trying my best not to fall asleep...LOL

I made a card very similar to this except for a few color difference and gave it to my Boss and friend on Boss' Day.  I decided to make another one when I saw the outcome...I truly love this card.


PRIMA FLOWERS FRIENDSHIP CARD:
I did embossing here and made my own paper using my ink on my polka dot clear stamps.  The stems  and leaves on the flowers  were cut free-hand.  I added some buttons, ribbon and EK Success border.  The sentiment is from Inkadinkado and aged with some inking.


PRIMA FLOWERS FRIENDSHIP CARD (LAYERS):
This is one totally cute card...The layers are phenomenal., so happy with it!


PRIMA FLOWERS FRIENDSHIP CARD (INSIDE):
Placed a panel of cardstock and inked...


PRIMA FLOWERS FRIENDSHIP CARD WITH ENVELOPE:
I had to make a coordinating envelope for this pretty card and so glad I saw a stamp that I can use to decorate the envelope....Over-all, this came out so pretty!  Hope you enjoy this  card and the other projects following this post.  Have a blessed day, everyone!

Dancing Tilda CHRISTmas Card....

It's that time of the year again and I must say that of all the holidays, CHRISTmas is my favorite.  I have made about 6 Christmas cards recently and my Aunt took all of them so, here's a couple more cards that I made just recently using my favorite image, Magnolia Tilda!  I enjoyed coloring her with my Bic/Prisma and Sharpie Markers...Although detailed, I enjoyed every minute of it...


DANCING TILDA CHRISTMAS CARD (GREEN)  6" Square...

DANCING TILDA CHRISTMAS CARD (RED):
Although these cards have a similar lay-out, a little color change made a great  impact in making this cards their own beauty...I embossed the sentiment, adhered quite a bit of gem stones and tons of stitching here too.


DANCING TILDA CHRISTMAS CARD (GREEN) INSIDE:

DANCING TILDA CHRISTMAS CARD (RED) INSIDE:
Lots of stitching inside too, lots of beauty....


DANCING TILDA CHRISTMAS CARD (GREEN) WITH ENVELOPE-BOX:

DANCING TILDA CHRISTMAS CARD (RED) WITH ENVELOPE-BOX:
I am very proud of these cards.  I thank the Lord Jesus for the ability to create...Thanks for the inspiration all the time...

Karaoke King Custom-Made Birthday Invite...

My Aunt asked me to make several invitation for her husband's 90th Birthday and although excited, I was also a bit worried on what design to come up with.  She told me that her husband is a Karaoke king and that he really loves to sing so, I was pretty sure she wanted me to incorporate that in the design...I asked if it was okay to use a paper doll and she was all for it.  She is not into serious cards...LOL  So, here's what I came up with...


KARAOKE KING (CUSTOM-MADE) BIRTHDAY INVITE (A7):
I had to look at some pics of the birthday guy so as to come as close as possible to this doll...Yes, he has all white hair...(or gray?...nah, white!)  I laid out the design on my Gypsy so as to cut as many pieces I can in one load.   I added some inking, embossing, stitching and some gems to decorate this card.  Stamped sentiment is from Studio G.


KARAOKE KING (CUSTOM-MADE) BIRTHDAY INVITE (LAYERS):
I added some detail to the Karaoke player as per my hubb's advice...He's  an Audio Guy so he insisted that I place a speakeron the Karaoke player...I think it did make it look nice.


KARAOKE KING (CUSTOM-MADE) BIRTHDAY INVITE (INSIDE):
I was pleased with how the inside of this card came together...Sweet!


KARAOKE KING (CUSTOM-MADE) BIRTHDAY INVITE WITH ENVELOPE:
I was happy I got done piecing this project together in a couple of days...I hope my Aunt loves it when she gets it in the mail...

Boss Day Custom-Made Card...

This is the first card I had a challenged with...A friend of mine who loves my cards a lot asked me if I can make her a card for her boss whose a former Air Force and a huge fan of Buffalo Bills.  For anyone whose fond of Sports, this couldld have been easy but in my case, I didn't know any football team so, I resorted to Googling pictures just o finalize a lay-out...And what better way to incorate my love for cardmaking with my Cricut.  I used Everyday Paper Doll cartridge to make this doll possible.  The doll is supposed to be wearing a comouflage shirt (didn't have one so, had to improvised) and a combat boots with a football helmet, football and pants.


BOSS DAY CUSTOM-MADE CARD:
I used Cuttlebug embossing on the base card and to decorate the inside of this card.  Lots of stitching too.  Quite a work!


BOSS DAY CUSTOM-MADE CARD (LAYERS):
Stamped the sentiment from Recollection letters clear stamps.


BOSS DAY CUSTOM-MADE CARD (INSIDE):
More stitching inside....

BOSS DAY CUSTOM-MADE CARD WITH ENVELOPE-BOX:
I ended up with a pretty thick card so,  had to make an envelope-box perfect for it.  I was relieved after I got done especially the day I gave this to my friend...She loved it!

Thursday, October 7, 2010

Sweet Candy Apple Card...

Hi there, fellow Crafters!  Just came back from a vacation a few days ago and yes, I am scrammbling to get back to my crafting amidst the busy schedules.  Working part-time, rehearsals with the Praise and Worship team at Church, Church services, Church community meetings, Bible classes and then, family and friends time...Oh my, I would love to stay at home for several days just doing my crafts but nope, that is not possible!  So, I do my crafts whenever I can find time in between...Anyway, I made 3 cards (the other 2 listed after this post) the past few days and want to share with you all. 


SWEET CANDY APPLE CARD:
"Hmmmm, yummy for my tummy!"  This was what my 5-year old said when I showed him this Dustin Pike Candy apple image after I colored it with my Bic/Sharpie/Prismacolor markers.  I love how it came alive in this card...I used my Pixie sewing machine for the first time and I love the results...I am not an expert sewer and I think it's very user friendly.  I did some Cuttlebug embossing on the base card, used my MS border punch, stamped the sentiment, added a satin ribbon and finished it up with some dew drops.  Fantastic!


 SWEET CANDY APPLE CARD (INSIDE):
Oh, I love the yellow and green combination here and the stitching made the inside of this card a beauty.


SWEET CANDY APPLE CARD WITH ENVELOPE-BOX:
This is a pretty thick card at 6-inch square so, I had to make an envelope-box for it as I do in most of my projects...Love, love, love the results and this is one card I am truly proud of. 

Okay guys, I have a couple of Christmas cards to include in my next post and if you have any comments or questions, please feel free to post them in the comment box...God bless you all and wanted to share this scriptures to you:

"Therefore being justified by faith,  we have peace with God through our Lord Jesus Christ:  By whom also we have access by faith into this grace wherein we stand, and rejoice in hope of the glory of God."  (Romans 5:1-2)


Pop-Up Elephant Birthday Card...

Pop-up cards...I often find myself looking at them when I go to Bookstores...There's always something with these type of cards that makes me smile.  I've been wanting to create one for the longest time and I have gathered lots of ideas but  it's only now I found the time to make one.  Presenting...MY VERY FIRST POP-UP CARD!


POP-UP ELEPHANT BIRTHDAY CARD:
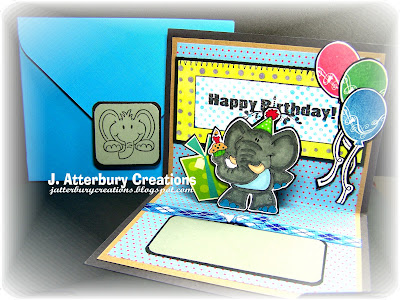
My friend's son celebrated his 7th Birthday and he is into anything elephant...This kid lives and breaths elephants, I tell ya!  So, what better way to make him happy on his special day than to create a card with the animal he loves...The image is from Dustin Pike collection and have used this image a couple of times in my projects...Colored with my Bic/Sharpie markers, added some glaze and embellishments on it and walah...he is one happy animal...

POP-UP ELEPHANT BIRTHDAY CARD (CLOSE-UP):
Stamped blue polka dots on a white cardstock and stamped "Happy Birthday" in black...Perfect!  I incorporated some stitching and more designer cardstocks  to achieve the look I wanted.  I stamped 3 balloons in 3 different colors, cut and matted them and attached with some pop-dots to give it a 3-D look.


POP-UP ELEPHANT BIRTHDAY CARD (FRONT):
I decided to make it simple in front since there's a lot of things going on inside the card.  Card size is A2.

POP-UP ELEPHANT BIRTHDAY CARD WITH ENVELOPE:
As you can see, I have several elephant images, I guess, I love elephants too...LOL.  I always make sure there's a space for special message in my cards so, that is what that blank panel is for...I got some inspiration from the book "Fabulous Folds for Cardmaking" in making this card...Got some ideas but managed to make it my own...This was fun to make but sure took me a while to gather the right combination of materials...Thanking the Lord for His inspiration each day.


Baby Boy Shower Card...

A friend of mine had requested me to make a Baby Shower Card to give to her office mate and decided to emboss the main  image and make it look vintage...I seldom go for the aged look but I love how this card turn out.  I got some inspiration from "A Card a Day" book from designer Julia Stainton.  But I managed to make it my own and my friend loved it...That is the most important part, right?

BABY BOY SHOWER CARD:
I think I got carried away inking with white pigment ink.  First time I ever used white in aging a card.  I am sure I will make use of it more often now...Stamped image from Inkadinkado and embossed with Tinsel Blue.  Used my Cuttlebug to embossed part of the base card too...I love how the brown with blue polka dot ribbon added a special touch to this card.  Oh yeah, there's some stitching too.


BABY BOY SHOWER CARD (INSIDE):
I aged it with walnut ink and did some embossing and I am happy with the results.  This is an A2 size card.


BABY BOY SHOWER CARD WITH ENVELOPE:
I am totally loving kraft cardstocks.  It's just my favorite base color.  I also found a brown polka dot button to accentuate the ribbon here.  A little bit of blue ribbon tied to it, attached to the ribbon and walah, this card is done...I made it sound simple but this card (with the planning and preparation time included) took me a few hours...LOL  Yeah, I don't make fast cards....


LinkWithin

Related Posts Plugin for WordPress, Blogger...