THE BLESSINGS OF CREATIVITY...

I thank the LORD JESUS for each day that is given me to create wonderful projects...As always, I give Him all the glory.


Sunday, March 28, 2010

A Fun Birthday Card for a Little Boy...

A blessed day, fellow Crafters!  I made this card as per request from a friend who wants to send her nephew a card for his 6th Birthday...My friend trusted me to make her something cool for this occasion and I believe she was all happy with the way this turned up...Why is it that most of my stuff are for girly-girls so, finding stuff  and concept that will be good for a boy is very challenging...Nevertheless, this is what I came up with. I also entered this card in this Challenge blogs:


SIDESTEP BOY-ZOO BIRTHDAY CARD:
This is becoming one of my favorite styles in card making.  It's just a lot of fun and the finish product is always delightful to look at.  I used my Recollection set for all the animals (first time I used them after several months on the shelf...LOL) and the boy image is from Whipper Snapper designs.  I colored them with Bic/Sharpie Markers except for the boy's face and arms...colored with Gamsol technique.  I cut them one by one and mat them too.  The grasses were die-cut from Sizzix borders in 2 different green CS...I combined the number and the sentiment due to lack of space and it actually turned well.  The fun part of all  was putting them altogether to make a nice concept.


SIDESTEP BOY-ZOO BIRTHDAY CARD (SIDE VIEW):
I really love the faces of the animals...They are all so cute especially that monkey waving at me...LOL


SIDESTEP BOY-ZOO BIRTHDAY CARD (TOP VIEW):


SIDESTEP BOY-ZOO BIRTHDAY CARD  WITH ENVELOPE:
 I had to make the envelope .25-inch thick to accommodate this card and it fits perfectly...So satisfied with this and my friend loved it too.

Anyway, this is all I got for now, folks!  Thanks for all your support in visiting my blog and appreciate all the comments.  Please keep them coming!  Today, look around you and see all the wonderful things that God has made and use that as an inspiration to get to know the Creator more than ever before (Romans 1:20)...Hugs!

A Couple of Cards I made last year before I went blogging...

Hi there, folks!  I am back with some cards I made last year that I forgot to post.  They were much simpler and I love them.  I want to share them with you so, here they are:


YOUNG AT HEART FLOWER CARD:
Here, I just used a wonderful stamp from Inkadinkado with some brown ink.  The card base is from a card set and I just added some ribbons, fancy flour delis borders and pop-dots and this card was done.


IT'S YOUR DAY CUPCAKE CARD:
I gave this to a friend who celebrated her birthday last year.  The image is from Inkadinkado and the sentiment from an old collection I had.  The card base is also from a card set and I embossed it with my Cuttlebug.  I finish it up with some fancy heart border, ribbon and pop-dots.  Love this simple cards...

Got to upload my newest creation card shortly.  Hope you have a wonderful and blessed day.

Tuesday, March 23, 2010

Bible Easel Card made for our Bible Class teacher....

Good Tuesday morning everyone...Been busy last week so, I was unable to post any project in here...But today, I just want to share this card that I made for our teacher in the Bible class that I participate in every week.  Words are not enough to express our gratitude for all the revelations we receive from his gifting.  So, this is just a small token or appreciation to a person who is faithful to his calling in the Body of Christ. I have also entered this card to the following challenges:

1.  Crafty Creations featuring Spots and Dots

BIBLE EASEL CARD:
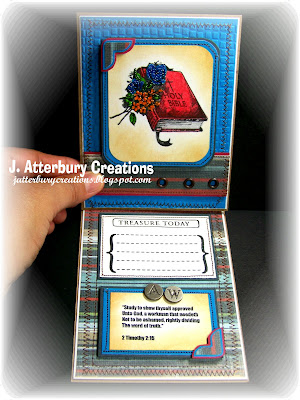
You all know how difficult it is to make cards for guys, right?  Here I tried my very best to avoid any girly embellishments.  The printed paper is from a Complete Boy stack (from My Mind's Eye) partnered with an aqua blue CS that I embossed with Cuttlebug.  The sentiment is computer generated featuring one of our memory verses in the class, 2 Timothy 2:15.  The Bible is colored using Gamsol technique and added some snaps and eyelets too.  The snaps were selected to feature the initials of our teacher.  I did some inking and lots and lots of stitching.  The flowers beside the Bible is colored by wet markers and heat embossed.


BIBLE EASEL CARD SHOWING SPACE FOR PERSONAL MESSAGE:
This card is so much fun to do but if you are like me at all, it is time consuming because I try to think on how to coordinate things.  In this case, I had to keep it as simple and manly as possible...I also handmade an envelope for this to accommodate the thickness of this card.  Sorry, for not including the pic of the envelope.


BIBLE EASEL CARD (THE WAY IT SHOULD BE HANDED TO THE RECIPIENT):
This is what is nice about this card style as it has an element of surprise.  It can be displayed unlike any other cards that you store away.  I really love this and glad it turned out great...Hopefully, our Bible teacher will love this too...

Okay, that's it for now...Wishing you all a blessed week and remember that Jesus is the answer to all of life's questions...I appreciate your comments so, keep them coming!

Thursday, March 11, 2010

Dress-up Glamour Gal Card....

Hey there fellow crafty people...I can't believe almost a week had passed since I last posted here...Time sure flies and things are so hectic on a daily basis for me.  Anyway, I just decided to use one of the newly acquired stamps I got from High Hopes and this is what I came up with...I also entered this card for the following challenges:


DRESS-UP GLAMOUR GAL CARD:
Isn't she pretty?  I love this image from High Hopes Stamp and her name is Danni...I sure had fun coloring her using the Gamsol technique and lots of glitters everywhere in the card.  I die cut the flowers (from Cricut Gypsy Wanderings) in 3 different sizes, embossed them with Cuttlebug and decorated with stickles, leaves (EK Success Punch) and dew drops.  The background paper for the image is also embossed with my Cuttlebug and designer paper was used for borders (love the glitter on that).  If you look closely on the image, she had her necklace and flower on her hat glittered too.  And did I mention about the gazillion stitching I incorporated on this card...Lots of work, I tell you! 


HERE'S THE INSIDE OF THIS CARD:
Pretty in ocean blue CS with lots of stitching too...And that embossed image just added to the magic...


HERE'S SIDE-VIEW FOR YOU:
This is a pretty thick card but sure love it! I came up with the lay-out, design, color all by myself.  One of those days that I don't have to browse on a book or online for inspiration.  I do get inspiration from the Lord Jesus for sure...


HERE,  WITH IT'S HANDMADE ENVELOPE:
Since this is not a typical skinny card, I had to make an envelope for it.  It's perfect at 1/4 inch thick.  Holds the card perfectly.

This is all I have for now...Will sure find another time to make some wonderful projects when I get the chance.  For the meantime, have a wonderful day and weekend to all of you...Praying for God's presence to guide you in every situation in your life...Hugs!

Tuesday, March 2, 2010

Cute Sidestep Birthday Card featuring Magnolia Tilda...


Good morning friends...I can't believe how time passes me by so quickly and I was not feeling good last night yet I was able to make this rather awesome card that I've been planning to create for the past 3 days...Well, that meant sleepless night...LOL This is my entry for:

1.  Just Magnolia Challenge featuring Birthdays
2.  Sketchy Colors featuring Pink, Red and Turquoise
3. Creative Card Crew  featuring Celebrations
4. Crafty Creations featuring Cut it out and Pop it up
5. Delightful sketches featuring Kids Theme 
SIDESTEP BIRTHDAY TILDA CARD:
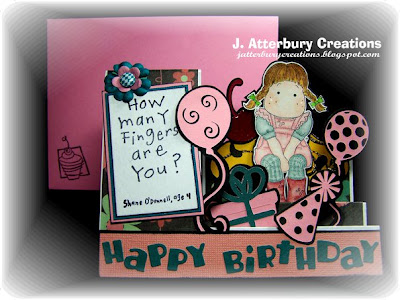
This Magnolia Tilda image was stamped and hand-colored with Prismacolor pencils and Gamsol (my favorite coloring technique).  Also love the very cute sentiment from Inkadinkado.  Tilda is sitting on a cupcake decorated with swirls and stickles.  The cupcake was cut from Cricut Home Decor cart while all the other die-cuts came from Cricut Celebrations cart.  I've had this cartridges for over a year and this was the first time I've used them..  I'm glad I did as they turned out well.  I matted the die-cuts with black card stock and they sure added some depth to the cuts.  This is a fun style card that is very 3-D. I love it a lot although it takes time to make but well worth the effort.


SIDESTEP BIRTHDAY TILDA CARD (TOP VIEW):
I am proud of how this card turned out...The "Happy Birthday" die-cut is cut from my QuicKutz (Squeeze) that I purchased several months ago at Hobby Lobby for 10 bucks (that's huge sale).  I just love the Moxie style dies that came with it.  Finally, I was able to use it too...I love it!

SIDESTEP BIRTHDAY TILDA CARD WITH ENVELOPE:
This is an A2 size card but it will not fit the regular A2 envelope due to all the embellishments so, I made a special envelope for it and just happy that this time, I didn't have a lot of difficulty with the measurements compared to the first time I had to make my own...Phew!

Anyway, this is all for now and time to get some lunch and sleep later on...LOL  I am such a night owl that my days and nights are reverse...I am thankful to the Lord as I am feeling much better after running a fever last night.  Thanks for the healing, Jesus!  You all have a fun day and please leave me a comment if possible...Love to hear what you have to say.

LinkWithin

Related Posts Plugin for WordPress, Blogger...